Brazilian Wood Depot
6770 Buford Highway NE
Atlanta, GA 30340
What This Guide Covers
This guide explains how to install Brazilian hardwood decking using the DeckMaster Undermount System, a hidden fastening method that attaches boards from underneath the deck frame. The system keeps the top surface clean and smooth because no screws go through the decking at all.
DeckMaster works well with dense tropical hardwoods such as Ipe, Cumaru, Tigerwood, and Garapa, which you can compare on our Hardwood Comparison Page or explore through the Decking Wizard.
If you are choosing between fastening systems, you can also review options on our Deck Fasteners Overview page.
What You’ll Learn
Inside this guide, you’ll learn how to:
- Attach DeckMaster brackets directly to the joists
- Secure hardwood boards from underneath using stainless screws
- Maintain proper spacing across the deck surface
- Work with standard board sizes like 1×6 and 5/4×6
- Choose the right screws and bracket layout based on your joist spacing
- Plan your framing so the system stays accessible during installation
If you’re comparing this system with other hidden methods, such as Deck Clips or CAMO Edge Fasteners, you can explore both on our Installation Guides Hub.
A complete Spanish translation of this installation guide is available for bilingual users, contractors, and inspectors. To read the guide in Spanish, use the button below.
Why DeckMaster Matters for Hardwood Decking
Brazilian hardwoods are extremely dense, which makes face-screwing more visible and sometimes harder to conceal. DeckMaster solves this by placing all screws below the deck surface, hidden behind the support structure.
Because the entire system mounts underneath:
-
The top of the deck stays smooth and screw-free
-
Hardwood boards show their full natural color and grain
-
There’s no chance of mushrooming or exposed screw heads
-
The deck frame receives strong mechanical attachment from beneath
Homeowners choosing premium hardwoods like Ipe or Cumaru (see the Ipe Decking Page and Cumaru Decking Page) often choose DeckMaster because it delivers the cleanest look of all fastening styles.
For boards that need face-fastening—such as picture frames, trims, or stair parts—you can pair DeckMaster with the Pro Plug System for a fully hidden installation.
Related Resources
Explore more installation help and hardwood resources:
- Deck Fasteners Overview — Compare DeckMaster, Clips, CAMO, and Pro Plug
- BWD Deck Clips Guide — Side-groove fastening for grooved boards
- CAMO Edge Fasteners Guide — Edge-screw installation for square-edge boards
- Pro Plug Certified Guide — For picture-framing and trim boards
- Messmer’s Cleaning & Oiling Guide — Maintenance instructions for Brazilian hardwoods
- Decking Wizard — Helps choose the right hardwood species and board size
- Hardwood Comparison Chart — See how Ipe, Cumaru, Tigerwood, and others compare

About the Author
I’m Sam, and I’ve been working with Ipe Decking and Brazilian hardwoods since I was a pre-teen, learning the trade directly under my father — the founder of Brazilian Wood Depot and a long-time leader in the hardwood industry. Today, I lead our sales and marketing efforts, but I’m equally passionate about creating high-quality educational resources that help homeowners and professionals understand everything they need to know about Ipe and exterior hardwood systems.
Over the years, I’ve taught thousands of architects, landscape architects, builders, and industry experts through live presentations and accredited online courses. My mission is to make hardwood design, installation, and long-term performance simpler, clearer, and more reliable for everyone.
If you want a deeper dive into Ipe and hardwood best practices, check out my free certification course here:
👉 Ipe Certified Course: https://www.bwdepot.com/ipecertified/
My YouTube channel, Brazilian Wood Depot, is also one of the most comprehensive online resources for exterior hardwood education, with a global audience tuning in to learn more:
https://www.youtube.com/@brazilianwooddepot
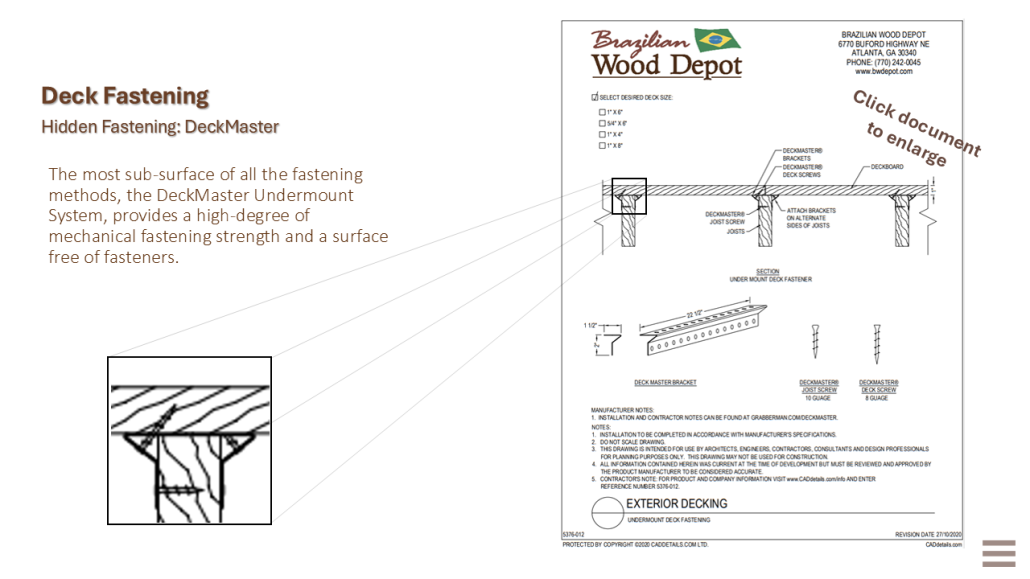
Text-Based DeckMaster® Undermount Fastening System – Installation Guide
## How the DeckMaster System Works
DeckMaster includes:
-
Specialized undermount brackets
-
Stainless steel screws designed for upward fastening
-
Layout guides to ensure proper spacing and alignment
The brackets attach directly to the top or sides of the joists, depending on the framing layout. Once installed, each bracket contains screw portals that allow upward fastening into the board above.
Fastener Location
All screws are installed:
-
From below the deck boards
-
Through the bracket system
-
Into the underside of the hardwood board
This eliminates all visible fasteners from the decking surface.
Key Benefits
-
No screw heads on the surface
-
Enhanced safety (no raised screws)
-
Preserves full hardwood grain appearance
-
Reduces surface cracking caused by face-screws
-
Creates a premium, uninterrupted finish for high-end hardwood decks
## Compatible Decking Materials and Board Sizes
The DeckMaster Undermount System is compatible with:
-
Ipe, Cumaru, Tigerwood, Garapa, Massaranduba, and other dense hardwoods
-
1×6 hardwood decking
-
5/4×6 hardwood decking
-
Additional square-edge profiles depending on joist orientation
Grooved boards are not required because the fasteners do not connect to the board edges.
## Bracket Styles and Installation Orientation
DeckMaster brackets may vary by model, but all share key characteristics:
Common Attributes
-
Crafted from corrosion-resistant steel
-
Pre-punched screw slots
-
Designed for upward fastening into deck boards
-
Compatible with 16″ or 24″ joist spacing
-
Can be installed at deck perimeters and field rows
Mounting Styles
-
Top-Mounted Brackets
-
Installed directly on the top edge of the joist
-
Provide maximum vertical stability
-
-
Side-Mounted Brackets
-
Installed on the vertical face of the joist
-
Useful when structural or design elements limit top access
-
## Preparing the Deck Frame
Proper framing ensures the undermount system works correctly.
Joist Preparation
-
Confirm joists are straight, aligned, and flush
-
Ensure joist spacing matches the required bracket interval
-
Joists must be structurally sound for upward screw penetration
Ventilation Requirements
As with all hardwood decks, airflow beneath the deck is critical for:
-
Moisture control
-
Reducing cupping
-
Allowing hardwood boards to expand and contract naturally
DeckMaster works best when installed over framing with unrestricted airflow.
## Step-By-Step Installation Instructions (Pages 1–4 Overview)
### Step 1 — Install the DeckMaster Brackets
-
Position brackets along the joists using the spacing layout shown in the guide.
-
Fasten the brackets securely to the joists using the recommended screws.
-
Ensure brackets sit flush and level so the deck boards install evenly.
### Step 2 — Prepare the Deck Boards
-
Sort boards based on length, color, and grain appearance.
-
Pre-seal cut ends with end wax to prevent checking.
-
Align boards perpendicular to the brackets for final fastening.
### Step 3 — Begin Upward Fastening
-
Place the first deck board on top of the frame.
-
From underneath, drive the upward-facing stainless screws through the bracket slots and into the underside of the board.
-
Do not overtighten; secure the board firmly without distorting it.
### Step 4 — Continue Row-by-Row Installation
-
Install additional boards by repeating the fastening sequence.
-
Maintain consistent spacing as established by the bracket system.
-
Check alignment after every few boards to ensure a straight layout.
## Joist Spacing and Board Alignment
DeckMaster systems typically work with:
-
16″ OC joist spacing (standard)
-
24″ OC spacing where permitted
Proper spacing ensures:
-
Correct load distribution
-
Even support for long hardwood boards
-
Predictable upward screw grab strength
Alignment must be checked as installation progresses because undermount fastening depends on bracket accuracy for consistent placement.
## Screw Type and Performance Considerations
Stainless Steel Screws
The system uses stainless screws to prevent:
-
Corrosion
-
Staining from steel contact
-
Fastener failure due to wood density
Upward Fastening Impact
Driving screws upward reduces:
-
Surface splitting
-
Board penetration damage
-
Mushrooming typical of top-screwed hardwoods
This method is especially effective for ultra-dense species like Ipe.
## Installing Perimeter Boards and Trim
The undermount method may not reach:
-
Outer picture-frame borders
-
Stair treads
-
Tight wall-adjacent areas
In these cases, use stainless steel surface screws paired with a plug system to maintain a hidden appearance.
## Maintenance & Inspection
The undermount system requires minimal ongoing maintenance:
-
Inspect upward screws annually from below
-
Look for framing changes or settling that may require tightening
-
Clean debris from between joists to prevent trapped moisture
The top of the deck remains easy to clean with no visible fasteners.
## Limitations and When to Use Alternative Systems
DeckMaster works best for:
-
Decks with open, accessible undersides
-
Premium hardwood installations where appearance is critical
It may be less suited for:
-
Second-story decks with limited underside access
-
Retrofit installations on existing framing
-
Projects requiring rapid installation without underside work
Alternative fastening systems include:
-
Side-groove hidden clips
-
Edge-screw systems (CAMO Marksman)
-
Face-screw + plug methods (Pro Plug)
## Safety & Work Considerations
-
Always wear eye, ear, and dust protection
-
Use ladders, crawl-space supports, or work platforms as needed
-
Check that tools can reach required fastening angles beneath joists
-
Use only stainless steel screws with hardwoods
## Contact Information
Brazilian Wood Depot
6770 Buford Highway NE
Atlanta, GA 30340
Phone: 770-242-0045
Email: sam@bwdepot.com
Customers are encouraged to leave a 5-star Google Review after completing their project.
End of Text-Based Reference Section
Resource Images & Visual Examples
Stainless screws secure hardwood boards from below without surface holes.

Top or side mounting options make DeckMaster compatible with many frames.

DeckMaster mounts underneath the joists to hide all fasteners.

The DeckMaster system hides all screws under the deck for a clean surface.
