
Aluminum Hidden Deck Clip Installation
Face Screwed deck installation is preferred over nails because they simply hold better. In addition, you can choose stainless steel screws, which will not stain your beautiful decking. Stainless steel nails are only (easily) available in finish nails because SS nails are too soft to use for most applications.
Hidden Fastener Deck Clips are often chosen by customers who don’t want to see the heads of the screws in the face of their deck boards. To use these, the boards must be kerfed (grooved) on the sides so that the clips can be inserted into the boards.
The Ipe Clip Extreme is an effective product made of stainless steel covered with plastic to blend in with the wood color. This ipe clip is installed by driving a screw through the hole in the clip at a 45 degree angle and through the board thereby holding the board from moving as the board shrinks slightly. Most installers find it easier to pre-drill a hole in the board so that they can drive the screw more easily. This pre-drilling to install the ipe clip is an extra step that some prefer to avoid.
Aluminum Deck Clips are durable and hold well but the boards may shift as they shrink because the screws are not driven down through the board. The screws are driven straight down through the clips between the boards.

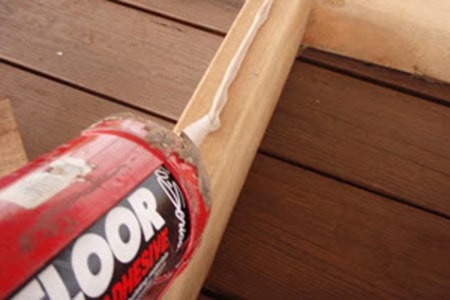
Using All Weather Sub Floor Adhesive solves this problem. The installation procedure for these aluminum deck clips is shown here.
Run a bead of adhesive down the top of the joists where you are beginning your deck installation.Apply enough to accommodate your first two or three boards.
Install your deck clips along the entire edge of the first board with a clip on each joist. The screw must be run down until the top of the screw is level with the clip. Do not tighten it down because this will tilt the free edge of the clip down thereby preventing you from slipping the 2nd board into place.
Once you’ve installed clips on every joist along the edge of the first board, slip the leading edge of the 2nd board into the clips snuggly.
Now, install the clips into the 2ndedge of the 2nd board on every joist making sure that you only drive the screw down until it is level with the clip. Do not screw it down too tightly.
Once this 2nd clip is installed on the 2nd board, go back to the nearest clip between the two boards and tighten it down firmly. Now, the clip will press the boards down on the glue and sufficiently seat them permanently.
A different installation technique must used for the first board edge (often against the house), the last edge (away from the house), the steps and risers because there is no joist to screw into or you cannot access the edge of the board.
Plugs that match your deck species are a very good option but the installation is tedious and they don’t leave any option to replace boards later if that need arises.
Hidden Brackets that screw to the the joists and to the under side of deck boards are a good option. They install easily and can be used on these few areas where the deck clips simply don’t apply well.
There you go . . . hidden deck fasteners.


Leave a Reply
Want to join the discussion?Feel free to contribute!